Σάββατο 8 Δεκεμβρίου 2007

Wrestling with bulkheads!

It has been a while since I have sent a post but I didn't have much time lately and the weather in Crete was so bad the last couple of weeks that I didn't manage to achieve any serious progress on the project. As I have mentioned before on this site, my "boatbuilding yard" is not perfectly sheltered and above all, not heated. As a result epoxy work stops as the weather gets colder and heavy rainfall means that I have to cover everything up with tarpaulins because sometimes water finds its way through the concrete walls and floor (This is not exactly the right time for my boat's first contact with water...). I'm considering of buying some kind of a heater though, otherwise my progress during winter time will be minimal.

The major task of these days was to fit the finished bulkheads to the hull sides. This was not an easy job at all! I used a combination of ropes, straps and hand power but I had some problems, mostly at the bow and stern sections where tension is grater. For example when I tried to fit in place bulkhead No1, whose position is very close to the bow, the stitches holding the stem post in place broke. Now I probably have to remove bulkheads 1 and 2 again to refit the stitches or else I should try to use screws but it is doubtful that they can hold the tension. Unfortunatelly I haven't attached hooks on my ceiling so that I can use ropes to support the whole construction, as Thomas Nielsen suggested( I didn't want to drill more holes to the already not water proof roof of my garage). I don't know if that would make it any easier to force the bulkheads in the lower hullsides, but I think it will help a lot in turning the hulls over for the glassing later on so maybe I will do it anyway.

Hopefully, by the time I have managed to install all the bulkheads of the starboard hull the temperature will be heigher, appropriate for my first fillets attempt!


Κυριακή 4 Νοεμβρίου 2007

Modifications.

One of the major advantages of building your own boat is that you can modify the original plans to adjust them to your personal needs. Wharram cats, with their flexy-space designed interiors and open decks, give you this opportunity to the maximum. Most of the internal volume of the Tiki 31 is sacrificed for the large open cockpits on the center of each hull. This for me is a disadvantage, because I would like to use my boat not as a day sailer but as a liveaboard for periods up to one month at a time. By permanently enclosing the cockpits I could create enough space bellow decks for a toilet in one hull and a galley in the other. These two features are essential for long time cruising ecpecialy when you want to spend the night in a harbor, next to other yachts. Moreover by having coocking and toilet facilities separate from the sleeping cabins you don't have to worry about unwanted smell, gass leakage e.t.c. I don't intend to increace the height of the cabins as this would affect wintage, nor will I try to change any other aspect of the original design. I love the scooner rig and the open deck area. That was the reason I chose to build the 31 instead of the Tiki 30 in the first place! In the photos bellow, Antonis, a friend, is helping me sand the bulkheads and give them a final coat of epoxy before installation.


Πέμπτη 1 Νοεμβρίου 2007

Preparing bulkheads.

The next step in the process is to install the floor bearers, bunk bearers, bunk supports and the deck beams to the bulkheads. Nothing difficult in this except for the deck beams, which are made out of 70x19 mm planks. Their upper side must be curved to give to the deck pannels (that they will support) their lateral curvature. Furthermore they must have notches for the deck stringers.
The fastest way I have found to cut these planks in the required shape is by making templates out of scrap 8mm plywood. I then clamp the plank with the template and cut it by using the router. In the photos bellow you can see the router mill I am using, with a ball bearing on its edge. This bearing uses the plywood template as a guide to give shape to the softwood deck beam.
As soon as I have managed to cut and glue all these pieces I then have to give to the bulkheads two coats of epoxy before I permanently install them to the hull. Hopefully I will finish these tasks within the next couple of weeks as the weather in Greece is still warm and epoxy work is easier.


Κυριακή 9 Σεπτεμβρίου 2007

At last something in 3D!

I've been working on this project for almost a year now, mostly on weekends. During this time my enthusiasm stayed unimpaired but there certainly were moments that I doubted about the result of my efforts. My previous experience in boatbuilding was zero, although I used to make some wooden furniture for my appartment. My tools are mostly electrical hand tools which sometimes made it impossible to achieve precision cuts or a smooth finish ( It seemed funny to try to cut identical plywood pieces, with a lot of curves, that measured 286,5 mm for example, with a jig saw!). If you add to these my minimal free time, the fact that I have to work without any help, the strict limitations the use of epoxy and glassfibre imposes and the confined, not perfectly sheltered space in my "boatyard", you have a good idea of the causes of my doubts! However, one of the reasons I had chosen to build a Wharram cat on the first place was that it could be built under imperfect conditions from totaly amateur builders. At least that was what JW and his enthusiasts claimed.
Now, after almost 400h of work, I also believe so! The plans have some mistakes but they are precice enough and they give you a step by step guidance throughout the process. As for the tools, there always seems to be a simple, low tech way to do things. You just have to use your imagination but, I guess, this is something you start doing the moment you choose to build a boat like this.
Some friends came over a couple of days ago to help me lift the hull and place it on mounts. The moment the two hullsides, wire stitched along the keel, stem and stern, were opened and the starboard hull took shape in front of our eyes, all my doubts and fears were gone. For the first time I was certain that what I was building in my garage was the boat that would take me to the seas I dreamt of!


Τετάρτη 5 Σεπτεμβρίου 2007

Wired.

During the last few days I managed to wire stitch the two lower hullsides together with the stem, stern and keel. The whole thing is starting to remind me of a boat! Now I have to persuade some friends to come over and help me lift the hull and put it on the mounts I made. Perhaps if I tempted them with a BBQ and enough beer....


Κυριακή 26 Αυγούστου 2007

Serial keeler!

No matter how hard I tried to stick to the plans during the construction of the keel it was useless! The broken keel that I had reglued and screwed started to crackle the moment I tried to bent it to follow the keelline. In the idea of it braking again I decided to cut it into its two parts which I would then skarf join together. To make the scarfs I followed Scott Williams' way. I clamped the two pieces together with one's end as distal to the other's as the length of the scarf I wanted to make( see photos below). The two pieces were then planed with an electrical hand planer making a continuous wedge which was then smoothed with the belt sander. The correct length of the scarf when joining pieces of wood like this is calculated by multiplying their width to their thickness. In my case the two pieces I wanted to join were 44x19 so the minimum length of the scarf should be 44x19=83,6 cm. When the glue was cured the result was almost perfect! The keel was as if it was made from one plank!


Making the scarfs.


The two planks glued together, hopefuly for the last time!


The constraction of two mounts with wheels was necessary so as to be able to moove the assembled hull on my own.


The two hullsides are layed precisely on top of each other and then screwed together.

The hullside was marked 10mm from the edge along the keelline and then holes were drilled every 12,5cm.


The stem that was predrilled along a line given by the plans is first clamped and then wire stiched in place.


The keel is ready to be drilled and wire stiched in place.


Πέμπτη 9 Αυγούστου 2007

Accidents happen!

I have just started working on the project again after ten days of summer vacation. Yesterday I managed to sand the inside faces of the lower hullsides-it is easier now that they are still flat on the ground-and drill the holes for the rope hinges on the stern. At the same time I am trying to finish with all the bulkheads so as to coat them with epoxy before I start assembling the first hull. Unfortunately as I was demonstrating to a friend how the keel flexes to follow the curvature of the keelline the keel broke a few mm beside the joint of its two parts!


This was something that worried me(I wouldn't like something similar to happen in an assembled hull!). For the keel I had chosen a kind of red pine as I couldn't find good quality Douglas Fir in Crete. This softwood was recomended in the plans and the one I found was of good quality, smooth grained, without knots. I guess I could use harder wood for the keel but then it wouldn't be flexible enough to take the shape needed and the tension would be larger. An other cause of the keel failure probably was that when I glued its two parts together I didn't nail them as well, as I was advised by the plans. I was planing to screw them together with inox screws just before the assembly. Keeping all these in mind I decided to cut off the broken parts and reuse the same wood for the keel . Hopefully when the hull is assembled and the keel is glassed ( at least three layers of glass cloth on each side) the possibility of it cracking will be minimized.


Working on the bulkheads.

Kika is testing the opening in bulkhead No3!


Sanding the inside face of the lower hullsides.


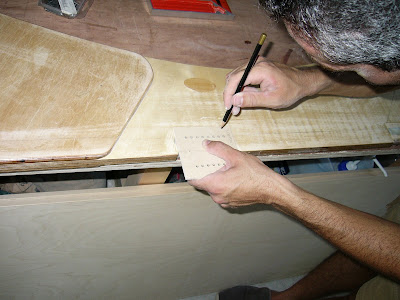
Drilling the holes for the rope hinges at the stern.


Reassembling the keel. I glued and screwed the two parts together this time!